Search
Complete Guide to Building Your Brewery

$19.95 USD

Support our site by using these affiliate links
Ventilation
STEP 4: Install fan and ducts
 Before we install our hood, we'll be installing our Vortex fan and some of the ducts.
In order to evacuate heat and steam from the room, we also need to introduce make-up air to the room. Using air from the rest of the house would be a waste of energy during most of the year as the air has already been heated (or cooled). Instead, we allow air from the outside to enter the brewery through a second duct to make up for the air we're removing. When the fan is running the brewery door is typically kept closed to avoid exhausting air from the rest of the house. Two duct runs to the outside are therefore required: One to vent heat and moisture to the outside, the other to bring fresh air in.
Our brewing room was originally a cold storage room located under the front steps of the house. Two 4" diameter vents to the outside were already installed by the home builder. We replaced the existing vent covers with something adequate to exhaust steam and to introduce the make-up air. While 6" ducts would be preferred (to minimize air flow restriction) our tests have shown that we still have sufficient air flow even though the last 2 feet are only 4" in diameter. Increasing the diameter of these 4" holes that pass through the house's cement foundation would have been significant work.
 Every room or house will be different so we can't give specific instructions on how to position your fan or ducts. Lengths will all be different. Here are some tips:
- Rigid metal or PVC ducting should be used for all duct work instead of flexible ducting.
- Duct length and turns should be kept to a minimum and the diameter should also be kept to 6" as much as possible. Using smaller ducts, turns, or added length introduces restriction which reduces air flow.
- If the duct has seams these should be taped along the full perimeter with aluminum foil tape to avoid possible moisture leaks due to condensation.
- To minimize the amount of condensation within the ducts (we want to vent as much moisture outside as possible) use duct insulation which can be applied to the outside of the duct. Condensation occurs as the steam cools while it travels along the duct so keeping the air hot as long as possible helps reduce condensation. (We haven't bothered to do this in our brewery but it's something to keep in mind if you want to keep condensation to a minimum).
- Try and maximize the distance between the exhaust output and the make-up (fresh) air input. We don't want recirculation to occur where heat vented outside ends up returning back in the make-up air return. (Our setup has the two vents only 4 feet apart but we do not have any issues with recirculation).
Rigid ducts should be used, not flexible ducts:
4" diameter vents shown from inside and outside the brewery (the pink brewers leggings are optional):
A fresh air intake vent with screen was installed for the make-up air entry point. The screen helps keep critters and bugs out of the brewery. The vent was sealed with 50-year all-weather architectural grade silicone sealant.


An all-metal 4" dryer vent with hood was installed for the heat/moisture output. It includes a hinged weighted door so that it seals from the outside when air is not being exhausted. The vent was sealed with 50-year all-weather architectural grade silicone sealant.
Metal 4" dryer vent hood for our brewery exhaust (left). The existing vent cover (right) was first removed: 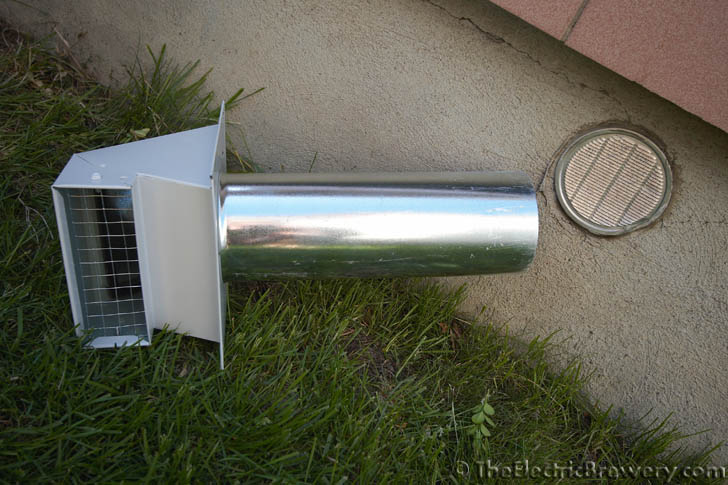
Both vents (nearly) installed and waiting to be sealed:
The fan brackets and metal strapping were used to mount the Vortex fan to the wall and ceiling. Duct work (including a 6" to 4" reducer in our case) was used to connect the fan to the 4" dryer exhaust vent shown above. Aluminum foil tape was used on all seals.
Vortex fan mounted:

Finished duct work (after the condensate hood was installed):


