Search
Complete Guide to Building Your Brewery

$19.95 USD

Support our site by using these affiliate links
Heating Elements
Electrical heating elements similar to those found in electric hot water tanks are used as heat sources in our brewery. Elements are installed in two of our 20 gallon Blichmann Boilermaker kettles: One in the Boil Kettle (used to boil wort) and another in the Hot Liquor Tank (used to heat strike and sparge water).
Sizing the element correctly is important: You want it large enough to be able to heat water fairly quickly and be able to maintain a good rolling boil in the Boil Kettle. A 5500W heating element is good for boiling around 8-20 gallons, perfect for our setup. If boiling less than 8 gallons, a 4500W heating element works well. If boiling more than 20 gallons, consider two 5500W elements.
 We use the Camco #02965 5500W 240VAC ultra low watt density (ULWD) stainless steel RIPP element. All Camco elements are UL listed for USA/Canada. One element provides enough heat to bring a typical 10-20 gallon batch to a boil within a reasonable time frame.
The element is ultra-low watt density (ULWD) which means that the heat produced per square inch along the element is very low which reduces the chance of scorching or caramelizing the boiling wort. These elements are typically folded over on themselves making the effective length twice as long as a regular element. This particular element uses a zig-zag pattern to make it even longer still, further reducing the amount of heat produced per square inch.
Is ULWD really required however? In discussions with many other electric brewers who use 'standard' density electric elements, the whole idea of scorching or caramelization seems to be mostly Internet folklore. We haven't come across one concrete example where this has happened, but we feel it's better to be safe than sorry, especially considering that the cost of ULWD elements is minimal compared to 'standard' elements.
There is however one very good reason to use ULWD elements over regular elements: They won't break as easily if fired up "dry" (not immersed in water). When a regular element is fired up "dry" the element will pop fairly quickly (usually before you notice your mistake!) as there is no water to dissipate the heat. While nobody means to fire up an element like this, mistakes do happen. Using ULWD elements provides you with a little bit of insurance against these human errors. Popping an element is about the last thing you want given that you've likely already milled your grain and have everything ready to go.
Heating element installed in the Boil Kettle (for boiling the wort):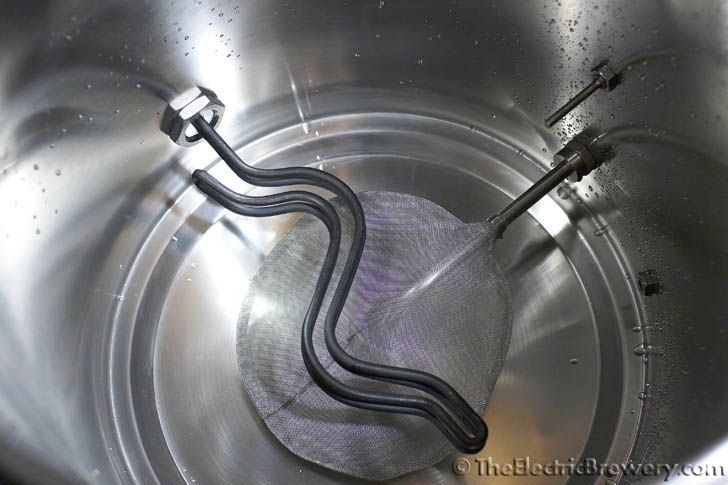
Heating element installed in the Hot Liquor Tank (for heating up the strike and sparge water):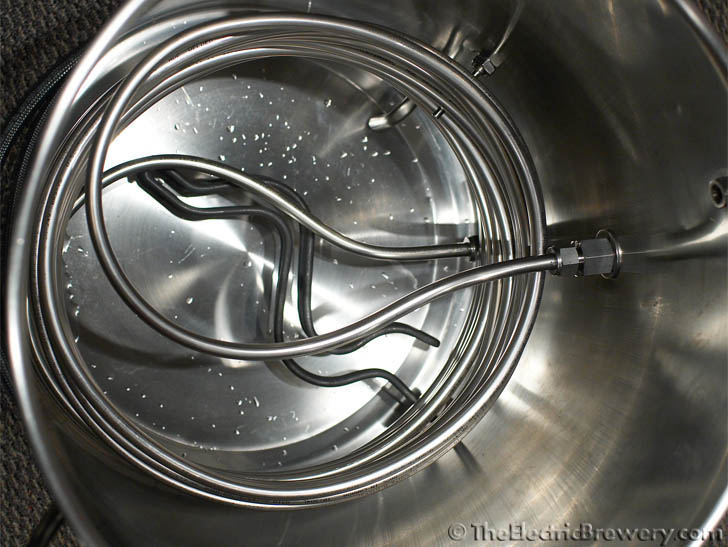
Outside view of the Hot Liquor Tank which shows the heating element covered up inside a waterproof metal box:
One of the most challenging things in creating our Electric Brewery was figuring out how to attach the heating elements to the Blichmann kettles in a safe and secure manner. You want the entire kettle to be electrically grounded for safety reasons, the same way any power tool or appliance chassis is grounded. Grounding means that the entire metal chassis (in this case the entire kettle) is connected to your house's electrical system ground plane. This ensure that any stray current can find its way to ground instead of through something else (such as the brewer!) in the off chance that something goes wrong and one of the 'hot' wires becomes disconnected and touches the kettle. Without proper grounding the kettle could become energized and pose a great danger. A proper electric brewing setup should always be properly grounded.
We also don't want any wires exposed as they could be easily damaged. Kettles are heavy and moving them around during cleanup provides plenty of opportunity for the brewer to inadvertently bump protruding parts against other things. No matter how careful you are, it will happen. We want the wires to be protected as much as possible and completely covered up.
The Blichmann Boilermaker kettles we use are all 100% weldless, meaning that there are no screw-on threaded fittings and none of the parts are welded on. We wanted to do the same with the heating elements. Some feel that weldless means you'll end up with poorly fitted, lose, or leaky connections. Not true. When done right weldless connections will be tight fitting, never leak or require any adjustments, and be perfectly safe. In the rest of this article we'll show you exactly how to do that.
You'll be installing heating elements in both the Boil Kettle and the Hot Liquor Tank. The method used to install the element in both is identical, so you'll have to repeat the instructions here twice (once for each kettle).
A note on rust: Previously we used the Camco #02963 5500W 240VAC ultra low watt density (ULWD) RIPP element which had proven to be very popular amongst home brewers with electric setups. Like most standard hot water heater elements this model has an iron base (not stainless steel) so it will rust if left in water for extended periods. Electric water heaters combat this by also having a sacrificial magnesium anode installed. The anode's sole purpose is to oxidize first, thereby protecting the heating element iron base from rusting. Brewing kettles do not have an anode so make sure you do not leave water in the kettle for a prolonged period of time if using a heating element with an iron base. This may be exacerbated if you have hard water. Some brewers will install a sacrificial magnesium anode in the side of their kettle to combat this issue if using a heating element with an iron base. See this forum thread for some example installations and instructions. Today we use the newer Camco #02965 (5500W) stainless steel heating element made specifically for beer brewing. An anode is not required.


