Search
Complete Guide to Building Your Brewery

$19.95 USD

Support our site by using these affiliate links
Brew Stand
STEP 1: Assembly
Use a saw (a compound miter saw works well) to cut the 2x6" lumber into five 61" and four 26" pieces. These will be used as the sides and a top center brace.
 Cut the 2x4" lumber into eight 34" pieces. These will be screwed together in sets of two to create the 4x4" legs.
Cut the 1x4" lumber into thirty-eight 26" pieces to be used for the shelf tops.
You should end up with the following pieces ready to be bolted & screwed together:
- (Qty: 5) 2x6x61"
- (Qty: 4) 2x6x26"
- (Qty: 8) 2x4x34"
- (Qty: 38) 1x4x26"
Lumber and parts ready to be turned into a brew stand:
The 3/8-16 hex nuts, 3/8" flat washers, and 3/8-16 x 5" hex bolts used:
Two of the 2x4" pieces are first screwed together with two standard 2.5" deck screws to form the 4x4" legs. The 2x6" boards are bolted to the outsides of these legs to form the shelf edges. Use a 6" long 3/8" softwood auger bit to drill holes for the 3/8-16 x 5" hex bolts to pass through and use 3/8" flat washers on both sides. The bolts will be too short by about 1/2” in the eight spots where they pass through the long side of the 2x4's. Widen the nut side of these holes to 1" to a depth of about 1/2" using a 1" drill bit to allow the washer and nut to be countersunk (or use 5.5" bolts). Tighten using a socket wrench.
A close-up of a top corner showing the 3/8-16x5" hex bolts that hold the sides to the leg: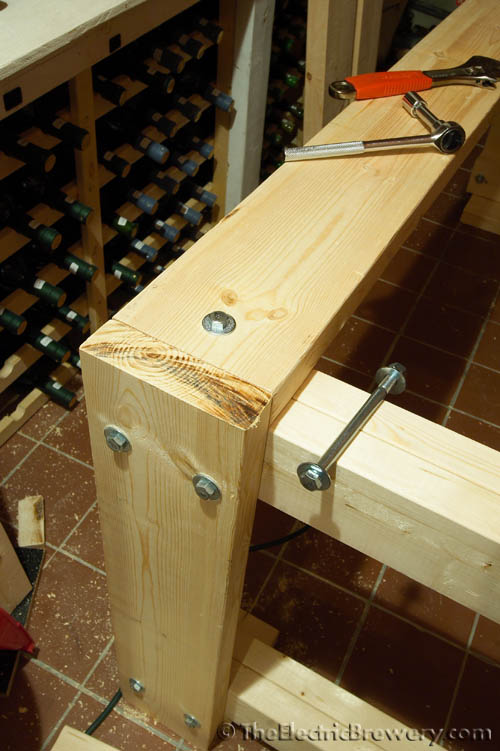
The four 3/8" x 5" lag screws (not hex bolts) are installed into the 2x6" top middle cross beam. A cross beam is not used on the bottom shelf as the weight is not significant.
Use a 6" long 1/4" softwood auger bit to drill pilot holes at least 6" deep first for the lag screws otherwise the wood may split or the screw may snap. Tighten using a socket wrench and remember to use a 3/8" flat washer. From the outside the hex bolts and lag screws look the same in our photos.
Once the frame is completed, install the 1x4" shelf top pieces using #8 x 1.5" flat head wood screws. Use a 7/64" softwod drill bit to drill pilot holes first to avoid splitting the wood.
Brew stand nearly complete:
Making sure all the equipment fits on the brew stand:


